Thursday, February 21, 2013

Extracting audio from a video file in Adobe Audition

This is a simple tutorial but it is targeted towards those who don’t have any idea on how they could extract a sound file (audio) from a video.  This short tutorial will basically introduce those of us who have this “How To” question in mind solve our problem.  It has all the steps mentioned supported with illustrations and I believe there won’t be a problem for anyone who wishes to have a go with this tutorial.

For this tutorial I have used Version 2.0 of Adobe Audition but you can also do this with the earlier version.

Let us begin the tutorial.

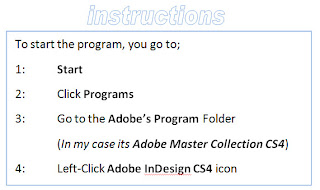
1: STARTING ADOBE INDESIGN

 Go to Start > Programs > Adobe Audition (see the illustration below

Figure 2.Adobe Audition V2. Multitrack View


After you click the audition icon, the application will be opened and you will see a window like the one on the left in front of you.

This window is a default window which you will use during your sound editing. 

Now let’s move on

* Let’s assume that we have a video clip (by a local artist) and we wanted to get only the music or audio part of that music which we will burn onto a CD or into our MP3s for us to carry around. 

Now, in front of us is the Audition Main window.  Usually the default view which you will be facing every time the application starts is called the Multitrack View (Figure 2 above).  On the top you will see all the menus beginning from File, Edit, Clip, View, Insert, Effects, Options, Window and Help.

The Multitrack View enables you to record audio on multiple tracks by overdubbing. When you overdub tracks, you listen to previously recorded tracks and play along with them to create sophisticated, layered compositions. Each recording becomes a new audio clip on a track.

We won’t be saying a lot on that but our aim is to extract the audio from a video file so let’s start with that.  Before we actually create an audio file we should first get the video file into Audition and how do we do that? Let’s look at step 2.

 2: INSERTING/ IMPORTING AUDIO

 Go, click the Insert Menu > down to Audio from Video (see illustration


After you click the audition icon, the application will be opened and you will see a window like the one on the left in front of you.

This window is a default window which you will use
during your sound editing.

Now let’s move on


3: EXTRACTING AUDIO FROM VIDEO


 A pop-up window appears.  This is where
you locate your video file.  So you select
your destination folder (folder where your
video file is located
), select your file, and
then click Open.  

(Illustrations on the left; pop-up window)


Now you will have the audio extract from the video and placed onto one of the tracks in the Multitrack View.  The first task is done.  We want to get a copy of it so let’s save our extract.

(Figure below shows the audio inserted into track 1)


4: SAVING AUDIO

Let’s save our audio now.  Go to the File Menu> down to Export > & Click Audio Mix Down.  (See figure below)


 You will see a pop-up window.  Select the destination (where you want to save the audio file) and click Save.


Wednesday, February 20, 2013

Creating Your First InDesign Project


In this tutorial, I’ll take you through the basics of using Adobe InDesign.  This demonstration will be done using Version CS4 and I’m going to work on Windows XP.  For this tutorial, you are going to create a booklet with 4 pages that has some text and various formatting done to it.

I’m not going to give lecture on the program.  I will only take you through the few steps that can help you familiarize yourself with the program so you can build your own project later on.  This tutorial is only a practical guide to help you accomplish certain common tasks.

The next set of paragraphs will take you through the rest of the basic processes that you can use to create almost any page layout for your project.

I’m confident you will learn something from this tutorial after going through it.  If you have further comments or queries, please do not hesitate to leave a comment after this post or visit my website for more free tutorials via URL http://www.artech.com.pg/pages/freeTutes.php .   

Furthermore, I do also have some detailed booklets to help you know more about InDesign which can also improve your layout design knowledge.  Visit my website to get more information if interested.


OVERVIEW:
In this tutorial you are going to set up your project, which is an InDesign Document and insert some data into it then later do some basic formatting.  The document you’re going to create would be an A5 size document.  This document would be a small booklet/ card with only 4 pages.  Because the document has less number of pages, it would be stapled once printed.  Consequently, we have to use an A4 size paper to arrange this setting.  The document would be a 2-sides folded document so the actual number of pages on the document setting in InDesign would be 2 pages of A4 size.  We would split those two pages to give us a total of 4 pages, left and right sides of the cover/ back and the inside pages.

1. Creating the Document

Start the program through the Start Menu;

2

1

31

4


Once you complete the 4th Step above, you would see a screen similar to the one below;


The first time Adobe InDesign starts, you would see the welcome screen (above) showing up in the center of the screen.  This window allows you to access some of the common tasks of the program such as Opening the recently used documents, creating projects, participating in online discussions, or to seek further help.  You are going to use this window to set up your document.

Don't worry if you don't have the welcome screen.  You can bring it in from the Help menu.  Go to Help Menu > Welcome Screen.

2. Creating the Document


 Once that is set, click OK and you should return to the welcome screen again.  If you've  closed the welcome screen, don't worry, just got to File > New to bring the New Document dialogue box or Help > Welcome screen to bring up the welcome screen.


3. Adjusting the Page Setting
Adjust your New Document settings to match the once below.  The changes are outlined in Red


4. Setting the Layers Palette

Open the Layers palette (shortcut = F7) and create two layers.  Rename the two layers to Texts and Images respectively as shown below.  Make sure Text layer is on top.


5. Setting the Layers Palette

Let's now set the Master layout of your design.  Switch to the Pages Palette by clicking pages palette or by pressing shortcut F12 key on your keyboard.


Make sure you're in Master page (A-Master).  You'll begin by setting up some background graphics for the page numbers and the header.  User the pen tool to come up with some shapes on both the top and bottom sections of your page.  Remember, this is like a template that would be applied to all the pages where you specify A-Master to be applied.


There are two pages on this document.  We cannot think of anything with two pages other than a Greetings or Season's card so let's assume that we're going to create a sort of greetings card.  The first page would be the Cover page and the second would be the inside of the card.

The first and foremost thing is to understand how the pages are arranged.  There are two pages created in InDesign (2 A4 sheets) but each page would have 2 sides.  The first page would be the Cover (front and back) and the second page would be the inside of the card (left and right sides).  When printed, there would be only 1 sheet of A4 paper but both sides would be printed.

To understand this clearly, let's look at the dummy below.  Notice how the pages are arranged so that you know exactly where you can design respective pages.


6. Adding Text Box

Now get the Type tool and draw a box on the right side of page 1 as shown below.


7. Adding Images

To add images, you should first deactivate any active tool.  Simply select the selection tool then click anywhere on the white space outside the work area.  This is just to make sure you don't have any object selected.  

Now do the following to insert an image;


We'll take a break now and on the next part (Part 2) of this training, I will show you the remaining process.


Tuesday, February 19, 2013

Convert any file to PDF

Splash Screens of different PDF Versions

A lot of time these days, people create files in various programs and would like to convert them to PDF.  PDF is one of the leading portable formats which is very handy nowadays and is widely used all around the world.  

The initials PDF stands for Portable Document Format and is a format that compresses files to be viewed using Adobe  Acrobat viewer or any third party PDF Viewer. 


If you would like to know more about PDF software, a list of them are listed in Wikipedia where you can read and learn more.  


In this tutorial, I will be using one of Adobe's product called Acrobat Distiller to convert files using the print function from any program.  It's very simple.  The logo looks like the ones below;
Some of the PDF Logos


Here's how;

First, you need to install Adobe Acrobat Distiller on your computer.  Restart your computer if necessary.  

Check this link (Adobe Website) to get a trial version to test it out.  It is important that you install the software before proceeding in order for you to convert any file into a PDF Format.

Once you have the software installed, here's what you do.

Open the program you are using.  

In this demo, I'll be using Ms Word 2007 and maybe Internet Explorer - for those who want to print straight from the web.  (NOTE: If you're getting something out from the web, make sure you read their TOR)

Using the File Menu of any software program, you can create PDF Files automatically.

Converting a Word Document to PDF;


Open your word document file.  Once the file is open, go to the File Menu > Go down to Print.  You may also want to use the shortcut instead; For shortcut, press (CTRL + P).


You will be prompted with a pop-up dialogue and that is the Print Dialogue window.  Select the preferred option as shown in the image below then click OK.  


You will then be asked to select where you want to save the file.  Choose your location and press save.  Your converted file would now be saved to the desired location you chose.


Converting a Web page to PDF;

Within the browser window, click on File Menu > Go down to Print.  

When you click Print, you will see a pop-up [Print Dialogue].

Now from this pop-up Print Dialogue window, look for the name Adobe PDF and select it.  Then press the Print button as shown below;

That's all you need to do.  Very simple, huh.  The rest is just specifying where you would like to save the converted PDF File.  


Hope you find this short tutorial useful.  Drop me a comment if you encounter any difficulties.  You may also want to visit my website for other free tutorials, tips & tricks including my range of services via URL http://www.artech.com.pg/


EMAIL PHISHING FRAUD "HOT PROPERTIES"


Have you ever received an email with subject "Hot Properties"?  Well if you did, then this article would give you an overview of the dangers you’ve gone through.  If you haven’t, please read the article and use it to help you avoid being in the loop of being fooled.  

Basically, the purpose of this article is to help those who have already being fooled into giving out their private information to spammers.  However, it could also be useful for those who haven’t received this email yet so they are aware.

Firstly, let me make it clear that one of the most effective tactics used by spammers lately is the hijacking or theft of legitimate user’s email accounts for use in furthering spam campaigns.

I’ve recently received an email from a colleague with the same title.  I know for sure that this is a spam however I wanted to confirm before writing up an article on this and post it on my blog (http://pyalamu.blogspot.com/) so I clicked the link to read the header.  After confirming, I decided to complete this article for the sake of others who would not be in the better position of understanding the risk.  I have also forwarded the link to various emails particularly to those that are linked to the email I received.  If you are one of those who read this article, please forward the link to your friends to help them protect their private information, especially their email credentials.

The demonstration I’m going to do would be presented using Gmail however, it’s similar to other email listed in the article.   

Here’s how it goes;

First, you receive an email.  What you would have heard was, if you know the person who sent you the email, you can feel free to open it because it is probably not a spam.  However, spammers are smart.  They go around the other approach to get what they want.

Recently, there are emails circulating which have the title “Hot properties” or similar?  The email comes from a known source or contact.  This, I mean from someone whom you know within your contact listing.  Considering the short brief above, you would realise that the person sending you the email is someone whom you knew.  Naturally, you would want to open the email because you knew the person sending you the email.  

Ask yourself, did you open the email?  If you said yes, that means you clicked on the subject to access the link.

Now, regardless of the exact subject and content of the email, clicking the link would take you to a site that requires your authentication to access their provided service once you sign in with your email account credentials.

I assumed you are one of those who have clicked the link.  If you haven’t received such email yet, you might probably receive one soon because it’s on its way to your electronic mailbox.

So, when you clicked on the subject “Hot properties” or similar, have you been taken to a page similar to the one below?

Have you tried to go further by clicking any of those email providers’ logo (Yahoo, Gmail, Hotmail, AOL, Other emails)?  If you did, were you prompted with a pop-up window like the one below?


I’m pretty sure for most of you, you probably would say, Yes, I did sign in for some unknown reason.  That is normal and it’s natural for most users.  I believe, a psychologist could explain further on this behaviour.

Normally, you would enter your details and press the sign-in button to log in assuming that the signing will grant you access to the provided service mentioned in the email you got.

The thing that is convincing after you sign would be the access to the site providing the proposed service.  For the case here, entering your user credentials would grant you access to the Re/ MAX listing site.  To you, it would be convincing because through signing in you gained access to the site however behind the scenes (from within the back-end) what happened was you provided your login details to the spammer through the script hidden within the source codes.

The spammers do know that you would come up with suspicions when things go wrong especially when you enter your login details and they do not log you in so they fake a login page that will redirect you to a page that tries to convince you that things are fine.  

Sometimes, the links take you to a fake site with the exact site name.  Other times, it takes you to a temporary page showing an error message and redirects you to go to the legitimate pages and sites using provided links.

Above all, the end result is that the spammer now had access to your email account whilst at the same time you are now carried away with exploring the RE-MAX website looking for these “Hot Properties” and you no longer bother about what you have done to yourself and all your friends, family or contacts in your contact listing.

Feel free to forward the link to your friends to help them secure their private information or email me (tribaltoons@gmailDOT.com) if you have any queries.  Also, you can visit my website (http://www.artech.com.pg/ ) for other helpful tips and free tutorials.