Wednesday, November 6, 2013

Download files with Internet Download Manager (IDM)


Many times, a lot of people have problems downloading files from the internet.  You probably might be one of them.  Have you ever faced problems such as breaks in file transmission or network failure or even your units ran out from your internet dongle and you couldn’t complete the file download?  It would be very frustrating when a file you’re downloading reaches 99% state before the download is complete and suddenly the download stops.  Imagine how you would feel after waiting for almost the whole night till morning spending maybe some good bucks just to download the trial version of your favorite software and suddenly everything stops just a percentage away from completion.  There is nothing you could do but to spend another same amount of money to start re-downloading the file again from the beginning. 


Well, in this tutorial, I am going to introduce you to this lovely program called Internet Download Manger or IDM for short.  It is a program, as the name states (Internet Download Manager) one could use to manage all his/ her download from the internet.  IDM Developers have given you 30 days to use it with almost all functions working.  It is a very useful program and I’d rather encourage you to use.

WARNING: Please, only use IDM to download files legally.

Firstly, you should get a trial version from the internet and install.  Open your favorite web browser and use that to search for the file.  I normally use Mozilla Firefox so I’ll start that up and do a Google search.  You can use Internet Explorer or other browsers too if you don’t have Firefox.

First, you have to download the software “Internet Download Manager”, then install it and use it. 


Use a search engine to search and download the program.  I use Google, you can also use Yahoo or other search engines to download.
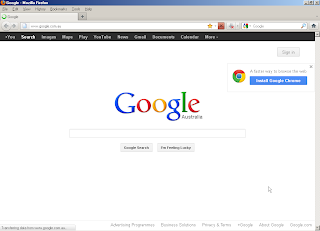

In Google Search box, type internet download manager and then click the Google Search button.

Google will return a search result for you.  Usually, the first result is the one you should use.  If you type exactly the word “internet download manager”, the first link would be the official IDM website link. 

Click the Download link (4) (image below) to download the setup file.
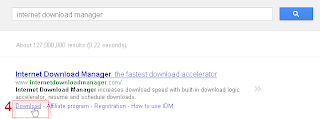


Download a genuine 30 day version from IDM website
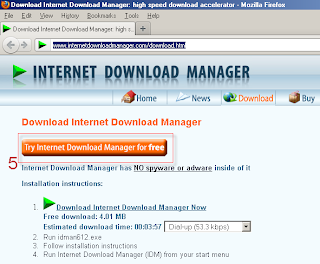


Now close the Browser before installing the program.  It’s important to close the program because IDM plug-in would be included into the browser’s functionality.

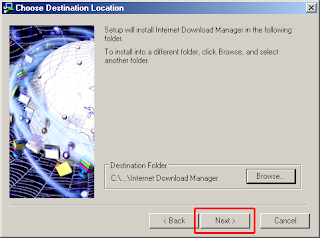
Install IDM and follow the instructions till installation is complete.


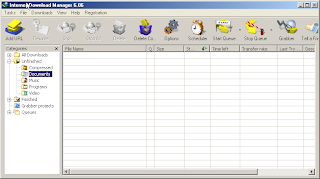
Once the installation is complete, you are now ready to start using IDM.  You can start the program by either double clicking its icon on your desktop or use the programs menu to start it.  The interesting thing about IDM is that, it will be integrated into any browser, especially Firefox or Internet Explorer.  (Haven’t tried with other browsers), update me if you did. 

You can now search for the program you wish to download (Be Careful with what you download from the internet).  I recommend you go to the official websites of the program you wish to download and download them from there.  Downloading files from third party sites or un-trusted sites can be harmful to your computer so try to go to only trusted sites to download files.

Use IDM to download.

In most cases, IDM should be integrated into your browser automatically when installed.  This makes it easier for you to download files from the internet.  Anytime you click on a downloadable file, IDM automatically pop-s up to allow you to save it to a specified location of your choice.  (Though you might be able to do a bit of configuration to IDM based on your connection).

(above) You get this type of pop-up when downloading a file
Sometimes, you have to use the right-mouse button (right-click) to download the file from the internet.  When you do a right-click, you would get a pop-up similar to the one below.  Usually there are two IDM options (Download all links with IDM & Download with IDM) You can either choose any of the two.  For singular files, choose Download with IDM (image on left).


IDM also has this function where videos are automatically detected from the internet.  Once a video(s) is/are detected on the page, a pop-up tab (screenshot below) is displayed.  You can click on the pop-up to download the video.


Well, that’s all I have to share for this tutorial.  I hope you can explore further once you’re used to the application.  There’re a lot more other configurations you can do with IDM using its menus.  In the meantime, I hope I’ve shared this tip to solve your download frustrations.

Hope you find this short tutorial useful.  Drop me a comment if you encounter any difficulties.  Use the contacts under the contacts tab of www.artech.com.pg.
Oh yeah, you probably wouldn’t want to miss visiting ArTech’s website where there’s dozens of other free tutorials to give you a fair start.  Free tutorials, tips & tricks including a range of services can be found via URL http://www.artech.com.pg/

Thursday, March 28, 2013

Flash Interactive for Beginners- Part 1


A quick rundown on the few steps involved in creating a basic interactive interface with buttons activated.  Very simple to start you off.  Take some minutes to complete the exercise to gain the basics. 

This tutorial will take you through various steps in setting up your stage, using various tools, modifying the properties panels, timeline, layers, testing moving and creating symbols.  This is Part 1 and it will take you through creating a working button with three states, the Up, Down and Over states activated. 

Visit http://www.artech.com.pg/ for more stuff or request other advance stuff via online request form there.

1. Start a new Project


2. Under the General Tab, select Flash (Action Script 2)

3. Document should be created then.  Few important panels named above for you to take note of.

4. Adjust settings accordingly

5. In the timeline panel (image above left), right click Layer 1, go to Properties and type "main"as the name of this layer (above right)

6. In the timeline panel, use the new layer icon (above left) to create two more layers.  Follow step 5 to rename the two layers to buttons and actions respectively. (image above right)


7. Go to the tools panel and select the rectangle tool (1).  From the properties panel (2), under Fill and Stroke, click the fill color palette (4) and select a grey color (5).

 
8. Still in properties panel, under Fill and Stroke, disable the color for the stroke (above)


IMPORTANT:
Before you start drawing the rectangle, confirm that you have selected the main layer on your timeline panel to draw the shape on.


9.  Draw a rectangle across the bottom of the stage as shown above.
10. In the tools panel (above left), select the pen tool and create additional points (above).


11. Go back to the tools panel, select the Subselection Tool and select the two points at the top-right ( image below). 

Simply drag with the Subselection tool from left to right as shown below to highlight both points.


Once they’re selected, use the down arrow down key on your keyboard to move the points down.  The idea here is to create some kind of placement for the buttons which you are going to create next.  Your new shape should look like the one below.  Feel free to modify later on.


13.  Create a button.  Under tools panel, select the rectangle tool (1).  Then go to properties panel, under Rectangle options (2) type 25 (3).  Under fill and stroke select black stroke (4) and a lighter yellow color for the fill (5).  You can always go back later and change the colors.  Also, set the stroke strength to 1 (6)


14. Now go to the stage (see step 3 for stage id) and draw a shape like the one above.  This will be your button.

15. Highlight the button shape.  Then press F8 to convert that into a symbol. 

 
Type “home” for the Name and select Button for the Type as shown on the left then click OK.


16. On the main stage, double click the button to get inside.  There you will add text to the button.


Once inside, create another layer for your text.  Take note of the layer options.  You would see four names and these are known as the button states (up, over, down)  plus the hotspot (hit)


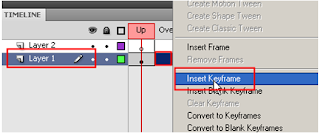
Select the first layer “Layer 1” then right click on each of the frames (just under over, down, hit states) and click insert keyframe.

This will allow you to insert keyframes so you can do necessary changes to the shape & color of the button.

  You should have something similar to the one on the above.  You can then go to each frame and adjust the properties and that’s what you will do next.


17. Now select keyframe under the over state (1), then go to the stage and click the inside (2) of the button (fill) to select, then go to the properties panel and change the fill color to orange. (3) .  Do the same for the other state “Down”.  Use maybe a maroon color for the down state.  Leave the hit with the set color.  This is only the hotspot to target the states.  You should now have three colors for the 3 states as show below.


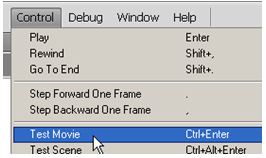
Test the movie by pressing Ctrl + Enter.  If you are still used to the old fashion way of going by every mouse move, I mean using the long process, you can find the same function under the Control Menu > Test Movie


Well, I hope you’ve learnt something new in this tutorial.  Please, don’t forget to post comments.

Thursday, February 21, 2013

Extracting audio from a video file in Adobe Audition

This is a simple tutorial but it is targeted towards those who don’t have any idea on how they could extract a sound file (audio) from a video.  This short tutorial will basically introduce those of us who have this “How To” question in mind solve our problem.  It has all the steps mentioned supported with illustrations and I believe there won’t be a problem for anyone who wishes to have a go with this tutorial.

For this tutorial I have used Version 2.0 of Adobe Audition but you can also do this with the earlier version.

Let us begin the tutorial.

1: STARTING ADOBE INDESIGN

 Go to Start > Programs > Adobe Audition (see the illustration below

Figure 2.Adobe Audition V2. Multitrack View


After you click the audition icon, the application will be opened and you will see a window like the one on the left in front of you.

This window is a default window which you will use during your sound editing. 

Now let’s move on

* Let’s assume that we have a video clip (by a local artist) and we wanted to get only the music or audio part of that music which we will burn onto a CD or into our MP3s for us to carry around. 

Now, in front of us is the Audition Main window.  Usually the default view which you will be facing every time the application starts is called the Multitrack View (Figure 2 above).  On the top you will see all the menus beginning from File, Edit, Clip, View, Insert, Effects, Options, Window and Help.

The Multitrack View enables you to record audio on multiple tracks by overdubbing. When you overdub tracks, you listen to previously recorded tracks and play along with them to create sophisticated, layered compositions. Each recording becomes a new audio clip on a track.

We won’t be saying a lot on that but our aim is to extract the audio from a video file so let’s start with that.  Before we actually create an audio file we should first get the video file into Audition and how do we do that? Let’s look at step 2.

 2: INSERTING/ IMPORTING AUDIO

 Go, click the Insert Menu > down to Audio from Video (see illustration


After you click the audition icon, the application will be opened and you will see a window like the one on the left in front of you.

This window is a default window which you will use
during your sound editing.

Now let’s move on


3: EXTRACTING AUDIO FROM VIDEO


 A pop-up window appears.  This is where
you locate your video file.  So you select
your destination folder (folder where your
video file is located
), select your file, and
then click Open.  

(Illustrations on the left; pop-up window)


Now you will have the audio extract from the video and placed onto one of the tracks in the Multitrack View.  The first task is done.  We want to get a copy of it so let’s save our extract.

(Figure below shows the audio inserted into track 1)


4: SAVING AUDIO

Let’s save our audio now.  Go to the File Menu> down to Export > & Click Audio Mix Down.  (See figure below)


 You will see a pop-up window.  Select the destination (where you want to save the audio file) and click Save.


Wednesday, February 20, 2013

Creating Your First InDesign Project


In this tutorial, I’ll take you through the basics of using Adobe InDesign.  This demonstration will be done using Version CS4 and I’m going to work on Windows XP.  For this tutorial, you are going to create a booklet with 4 pages that has some text and various formatting done to it.

I’m not going to give lecture on the program.  I will only take you through the few steps that can help you familiarize yourself with the program so you can build your own project later on.  This tutorial is only a practical guide to help you accomplish certain common tasks.

The next set of paragraphs will take you through the rest of the basic processes that you can use to create almost any page layout for your project.

I’m confident you will learn something from this tutorial after going through it.  If you have further comments or queries, please do not hesitate to leave a comment after this post or visit my website for more free tutorials via URL http://www.artech.com.pg/pages/freeTutes.php .   

Furthermore, I do also have some detailed booklets to help you know more about InDesign which can also improve your layout design knowledge.  Visit my website to get more information if interested.


OVERVIEW:
In this tutorial you are going to set up your project, which is an InDesign Document and insert some data into it then later do some basic formatting.  The document you’re going to create would be an A5 size document.  This document would be a small booklet/ card with only 4 pages.  Because the document has less number of pages, it would be stapled once printed.  Consequently, we have to use an A4 size paper to arrange this setting.  The document would be a 2-sides folded document so the actual number of pages on the document setting in InDesign would be 2 pages of A4 size.  We would split those two pages to give us a total of 4 pages, left and right sides of the cover/ back and the inside pages.

1. Creating the Document

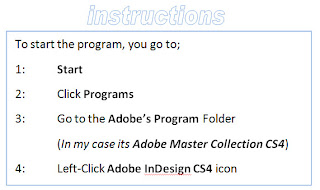
Start the program through the Start Menu;

2

1

31

4


Once you complete the 4th Step above, you would see a screen similar to the one below;


The first time Adobe InDesign starts, you would see the welcome screen (above) showing up in the center of the screen.  This window allows you to access some of the common tasks of the program such as Opening the recently used documents, creating projects, participating in online discussions, or to seek further help.  You are going to use this window to set up your document.

Don't worry if you don't have the welcome screen.  You can bring it in from the Help menu.  Go to Help Menu > Welcome Screen.

2. Creating the Document


 Once that is set, click OK and you should return to the welcome screen again.  If you've  closed the welcome screen, don't worry, just got to File > New to bring the New Document dialogue box or Help > Welcome screen to bring up the welcome screen.


3. Adjusting the Page Setting
Adjust your New Document settings to match the once below.  The changes are outlined in Red


4. Setting the Layers Palette

Open the Layers palette (shortcut = F7) and create two layers.  Rename the two layers to Texts and Images respectively as shown below.  Make sure Text layer is on top.


5. Setting the Layers Palette

Let's now set the Master layout of your design.  Switch to the Pages Palette by clicking pages palette or by pressing shortcut F12 key on your keyboard.


Make sure you're in Master page (A-Master).  You'll begin by setting up some background graphics for the page numbers and the header.  User the pen tool to come up with some shapes on both the top and bottom sections of your page.  Remember, this is like a template that would be applied to all the pages where you specify A-Master to be applied.


There are two pages on this document.  We cannot think of anything with two pages other than a Greetings or Season's card so let's assume that we're going to create a sort of greetings card.  The first page would be the Cover page and the second would be the inside of the card.

The first and foremost thing is to understand how the pages are arranged.  There are two pages created in InDesign (2 A4 sheets) but each page would have 2 sides.  The first page would be the Cover (front and back) and the second page would be the inside of the card (left and right sides).  When printed, there would be only 1 sheet of A4 paper but both sides would be printed.

To understand this clearly, let's look at the dummy below.  Notice how the pages are arranged so that you know exactly where you can design respective pages.


6. Adding Text Box

Now get the Type tool and draw a box on the right side of page 1 as shown below.


7. Adding Images

To add images, you should first deactivate any active tool.  Simply select the selection tool then click anywhere on the white space outside the work area.  This is just to make sure you don't have any object selected.  

Now do the following to insert an image;


We'll take a break now and on the next part (Part 2) of this training, I will show you the remaining process.